PARTY TIME IN THE MATH ROOM
Inspired by a visit
to the Museum of Science and Industry display of "Christmas Trees Around the
World", 1996, these ornaments are direct applications of mathematical
concepts. The ornaments function as manipulative teaching devices whether the
instructor displays and describes a finished ornament or the student
constructs an ornament. A brief history, description, application, or function
is provided for most ornaments as well as suggestions for interdisciplinary
connections. In the presentation, overhead transparencies of diagrams and
sketches complement these written instructions. Source materials referenced in
the instructions are listed in the bibliography.
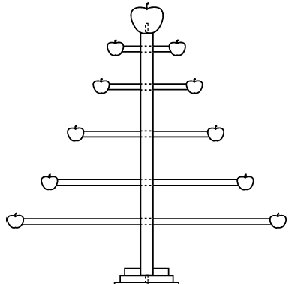
SCANDINAVIAN ORNAMENT TREE
The Scandinavian
Christmas Tree used to display the scaled manipulative ornaments is similar to
the traditional German Feather Tree but translated into a simplified wooden
tree. Spacing of branches and graduated length of branches can be altered to
individual needs. (Author's scale diagram and materials used listed at end of
handout.)
FOLDING STRUCTURAL UNITS, NO CUTTING
TRI-PLANE
DIAMONDS
Easy introduction to simple unit paper folding. 3-D shape based on
old German blown glass ornaments. Useful in demonstrating properties of
45-45-90 triangles in 3-D. Visual point-line-plane definitions. Introduces
concept of interlocking units, which are stable without glue or fasteners.
Materials: six congruent squares (two
each of three colors to simplify instruction).
Fold each square with
mountain folds along each diagonal of the square, and two valley folds that
connect the midpoints of opposite sides (medians).
Lay the paper down
so that the mountain folds are up and the paper forms a 3-D four-pointed star.
(Fig. 1) Compress the horizontal valley folds together so that the valley
folds all meet in the center to form a vertical line. You will see four right
triangles sharing a common side in the center. One opposite pair of triangles
forms flaps to be inserted into pockets of another square. The other opposite
pair of triangles forms the pockets which will receive the flaps from another
square. (Fig. 2) IMPORTANT: MARK BOTH SIDES OF EACH FLAP WITH AN "F" SO YOU
KNOW WHICH POINTS ARE FLAPS. THESE MARKS WILL GET COVERED UP. Make all six
folded squares exactly alike. To assemble, hold the two folded units of color
one together so that the bases of {PAGE }all four right triangles on one
folded unit line up exactly with the bases of the four triangles on the second
folded unit. (Fig. 3) Place the pockets of one folded unit of color two across
two flaps of color one. You will be covering one flap from each unit of color
one. (Fig. 4) Do the same on the opposite side with the pockets of the other
color two folded unit. You will be able to see one diamond-shaped plane of
color one that is split down the center, and two planes of color two. One
plane of color two appears solid and the other plane appears split. You need
to use the two triangles of the third color to insert into the color one
pockets and cover the color two flaps. Then the 3-D diamond will be complete
and fairly stable. You should see three intersecting square planes, one of
each color. (Fig. 5)
ADJUSTING OCTAGON STARS
Use when discussing
radial symmetry, dilation and contraction. Concept of unit origami used here
to lesser degree. Materials: eight squares of paper. Make both diagonal valley
folds. Make one horizontal valley fold which connects midpoints of opposite
sides. (Fig. 1) Place the paper so that the horizontal fold is left to right,
not up and down. Fold the upper and lower left corners in to meet the midpoint
of the square. Crease sharply. Push the right half of the horizontal fold up
and in so that the fold is reversed. (Fig. 2) Now fold the entire unit in half
along the horizontal fold by bringing the top edge down to the bottom edge.
You will have a parallelogram with two small top and bottom edges. (Fig. 3)
Make all eight identical parallelograms. To assemble: the right slanted side
of each unit will form a pocket into which another unit will interlock. Slide
a second unit into the pocket as pictured in Fig. 4. The lower right points
will be the portions that fold over another unit to lock the unit in place.
(Fig. 4) When all eight units are interlocked properly, the octagon can be
manipulated to dilate, leaving a center octagon, or manipulated to contract,
exposing the points of an eight-pointed star. (Fig. 5)
DUTCH TRANSLUCENT PAPER STARS
Applies to
discussions regarding radial symmetry, repetition of pattern, and
approximation of circumference of circle with increasing sides of regular
polygons. Europeans make these from identical folded units of translucent
paper (kite paper or tissue paper), designed to hang in windows. The units are
folded of square or rectangular paper, overlapped and glued, and hung in front
of a light to display the shapes resulting from the overlapping of identical
units. (Applications to art and color wheels, color families.) Experimentation
will be successful if one rule is observed: the angle measurement of the
central angle of one completed unit must be larger than 360 divided by the
number of points of the star. Otherwise, there is no room for overlapping and
gluing. (Window Stars, Thomas Berger)
UNIT ORIGAMI BALLS
Many excellent source
books are available for instruction. This activity is very simple to teach in
class because students need to master only one folding sequence to make one
type of unit for open polyhedra. Mastering a second type of folding sequence
will enable students to make a different type of unit for solid polyhedra.
(All units are folded from the same size square paper.) When students master
the solid tetrahedra folded unit, teaching students to use joiner units to
build sculptures is an easy step. (Unit Origami, Tomoko Fusi.) Shown below are
basic folds for the open polyhedra and the closed polyhedra units. (Based on
Unit Origami, pp. 62-63 and p. 134.)
FOLDING AND CUTTING
SNOWFLAKES
Useful in
teaching reflection, rotational symmetry, flips and glides. Helpful in
investigating properties of hexagons and investigating 30-60-90 triangles.
Visual demonstration of circles, chords, rays, radii, tangents. Connect to
formation and structure of ice crystals. Discuss concept of positive and
negative space as design elements. See Rose Windows and Polish Wycinanka
(Gwiazdy variation) for a variation of snowflakes. Only six-pointed snowflakes
are considered.
Materials: Circles of
thin paper, about 8 inches in diameter. (Later, students will be able to fold
paper correctly without cutting circles first.)
Begin with fold across
diameter of circle. Crease sharply. Mark center of diameter. Fold this
semicircle into thirds. Approximate a 60-degree angle by folding one radius
edge so that it lies halfway between the fold in progress and the other radius
edge. This will take practice to fold accurately every time. Take care that
the central angle is always extremely accurate, pointed, and sharply creased.
When the semicircle has been folded into three sectors with central angles of
60 degrees, press all edges again with a pencil or edge of ruler. (Fig. 1)
Last fold is to crease all triangles in half, resulting in twelve sectors with
30-degree central angles. Snowflakes can be cut into patterns similar to those
found in any craft book. Try using geometry concepts such as rays, constructed
arcs and semicircles, radii to the point of tangency, sine curves to create
the designs. (Fig. 2) Predict the finished snowflake design by looking only at
the 30-degree sector. Try printing or writing a name or message in the sector.
Be careful to connect the letters to both sides of the sector.
ROSE WINDOWS
This ornament follows directly
from techniques of snowflake cutting with a few alterations. Traditionally
rose windows in European cathedrals were based on a division of sixteen parts.
The windows were framed with stone and iron, and colored pieces of glass were
fitted into a pattern determined before construction. They were made to admit
light into the dark cathedrals and to inspire worshipers with their beauty.
Hung against a window, these tissue paper rose widows admit light, and the
layers of color create new colors as they overlap.
One simple pattern
is shown below. Experimentation will allow the student to explore many
different possibilities of circle division, radial symmetry, and
pattern.
Materials: Heavy cardboard
rings, two of each size window you want to make. (Cut your own from poster
board. The rings should be from 1/2 t 3/4 inches thick and of a neutral
color.), colored tissue paper, non-drip adhesive, pencil, scissors capable of
cutting fine lines and details.
First select four colors of tissue
paper plus one white layer on top. Stack them up and place one of the
cardboard rings on top. Trace around the inside edge of the cardboard and cut
out the tissue circle, adding a margin of 1/4 inch all around as you cut. This
margin will get hidden between the layers of cardboard so cutting does not
have to be exact. Glue the white sheet onto the inner cardboard ring using the
penciled circle as a guide to make it fit. This white sheet now serves as the
foundation for the next layer. All four remaining cut-out sheets must be
folded in this way: fold in half, fold in half again, fold in half once more,
holding together the edges which want to spring apart. You now have eighths.
Fold in half one more time but this time fold half of the bundle
upwards and flip the other half downwards to help get a precise fold. (Folds
must be sharp and precise in all of these steps.) You now have one wedge. Fold
all four sheets into wedges. Lay the four wedges beside each other so that
they make quarter of a circle with the lightest color to the left and the
darkest color to the right. (Fig. 1) Mark the seam allowance on the right
wedge. Now mark the heavy curved line in Fig. 1 on the wedges, being careful
not to draw over the seam allowance.
Cut along this line on each
wedge. Save the four cut-off points of the wedges for later use. Unfold the
lightest color wedge, smoothing out the creases as you unfold. Now lay the
piece onto the base, covering the white foundation evenly. Glue it on in the
same way as the white tissue paper was glued onto the cardboard ring. Unfold
the second part and smooth it out.
Important: all the creases made
while folding must lie exactly on top of each other. It does not matter
whether the crease is facing up or down, but that the creases that are
important to the pattern are exactly lined up. Continue with the third and
fourth wedges. (Alignment trick: first align the vertical creases in the
direction of the arrows. Then push them up or down until the remaining creases
coincide.) (Fig. 2) The second cardboard ring will now cover the ugly glue
area and strengthen the frame at the same time, so make sure that it is well
glued. (Rose Windows, pp. 9-14.)

GERMAN SCHERENSCHNITTE, CHRISTBAUMSCHNITTE,
FALTSCHNITTEBANDER,
POLISH WYCINANKA
Scherenschnitte (shear'en-schnit-tah)
- "Scissors-cutting". Flat, cut-paper designs which are intricate, decorative
artwork utilizing reflective symmetry. Christbaumschnitte
(krist-bowm-schnit-tah) - Cut paper designs for hanging on Christmas trees.
Each reflectively symmetrical design is cut twice with evenly spaced pinpricks
down the center that will be used to sew the two pieces together, thus
creating a 3-dimensional ornament. Faltschnittebander (fahts-schnit- ben-der)
- folded paper border cuttings designed to drape on the Christmas tree like
garlands. Polish wycinanka (vi-chee non-key) - cut-paper symmetrical designs
with the following variations: Leluja (le-lu-ya) - Folded lengthwise and cut
symmetrically, Gwiazdy (g-vee-adza) - "Star" shaped designs cut from round
paper which make eight, sixteen, or thirty-two repetitions. (Art From Many
Hands, Schuman.)
WEAVING
SWEDISH HEARTS
Paper: These simple hearts require two pieces of
construction paper (or any paper sturdy enough to weave) and scissors. Cut two
rectangles approximately 2 1/2 inches wide and 8 inches long. Fold
horizontally and stack both pieces with fold down. Trim all four upper (open)
edges into a curve. Cut slits 2 3/4 inches long from folded edge up toward
curve. Number the sections as shown (Fig. 1) and place the two sections at
right angles to each other. Weave in this order: 1 through 4, 4 through 2, 3
through 4. (4 is now completely woven. Slide it up toward curve.) Weave 5
through 1, 2 through 5, 5 through 3. (5 is now completely woven. Slide it up.)
Weave 1 through 6, 6 through 2, 3 through 6. (6 is now completely woven.
Adjust woven area so point of heart is neat and tight. [Fig. 2].)
Straw: Traditional materials used in
Sweden to weave, tie, or braid ornaments. See example from Gini Sharp, Wheat
Weaving Creations.
GERMAN FOLDED STARS
(History and directions from The
Pennsylvania German Folk Art Christmas Tree.)
Paper
folded stars, traditional fixtures on German Christmas trees, can be traced to
the Martin Luther legend. The Star of Bethlehem symbol is of universal appeal
throughout Christiandom. The origin of folded stars is ancient and is found in
various forms through all cultures worldwide. German folded stars were also
used outdoors to decorate evergreen and shrubbery near the house.
The
weather proofing technique to keep the stars from rain or snow damage was to
dip them into melted paraffin or wax. Stars are made from long strips of
paper, cut evenly into one of these dimensions: 4-inch star - 4 strips of
paper 1 inch wide and 30 inches long, 2 1/2 inch star - 4 strips of paper 1/2
inch wide and 18 inches long, 1 1/2 inch star - 4 strips of paper 1/8 inch
wide and 13 inches long.
Weaving: Each
star takes 4 strips of paper. Fold each strip in half and cut ends into
tapered point. Place the four folded strips in interlocking position to form a
basket weave. (Fig. 1.) Tighten the basket weave to interlock firmly. Turn
over. Holding in left hand, turn down front strip at upper left. Crease and
turn star clockwise. (Fig. 2.) Fold down 3 remaining top strips to form a
second basket weave, turning clockwise. Weave the fourth strip through the
first strip. (Fig 3.) Fold upper right strip away from you to make right-angle
triangle #1. Fold strip toward you to form triangle #2. Fold triangle #2 over
triangle #1 to form point as in Fig. 5.
Weave end down through basket
weave. Turn clockwise and make points on 3 remaining upper right-hand strips.
Push loose strip out of your way for last weaving. (Fig. 5.) Turn star over
and repeat steps 4 and 5 until you have 8 points. The star will now have 4
strips showing back of 4 points and 4 strips covering 4 points. (Fig. 6.) To
make center points, take end of lower right hand strip in right hand and with
a loop motion, keeping right side up, push through upper left-hand basket
weave and flat point. (Fig. 7.) Pull strip tight to form point. Turn star
clockwise and continue until you have 4 points at center. Turn over and repeat
on other side. (Fig. 8.) Trim ends.
JAPANESE BIRDS
(Workbasket Magazine, September,
1978)
Cut two pieces of one-inch ribbon 12 inches
long. Draw a line across each strip 1 1/4 inches from each end. Mark a line at
1/4-inch intervals. Slit ribbon into four strips by pushing a pin through
ribbon at one of the marks and stripping to end of ribbon. With solid portion
at left, mark strips 1,2,3,4. Fold strip 1 at a right angle to itself and
weave it UNDER strip 2, over strip 3, and under strip 4. (Fig. 1.) Lay second
wing piece in same position with solid part at left. Fold strip 1 at a right
angle and weave it OVER the 2, under the 3, and over the 4. Fold strip 2 at a
right angle and weave it over 3 and under 4. (Fig. 2.)
Turn the second
wing piece over, solid portion at right. Interweave strips of two wing pieces.
(Fig. 3.) Push interwoven pieces together to begin forming solid woven back of
bird. Place a drop of glue between each set of two ribbons at crossing to hold
woven portions in position. Bring long strips up and over; continue to
interweave to form hollow body of bird - four strips will be pointing in one
direction, four in the other. (Fig. 4.) Draw four strips through center
opening at tail end of bird, the other four strips through body opening at
head end of bird. Grasp the two sets of four ribbons each, one in each hand,
and pull gently until ribbons mesh and body is plump. Hold four ribbons at
head end together and tie them into a knot to form head of bird. Trim extra
ribbon into a point to make bird's beak. Glue tail ribbons together to hold in
position where they come out of body opening; trim to desired length. Using a
pin, shred ribbons to make feathers. Trim wings to shape and slit into
feathers if desired. Glue black beads or sequins to the sides of the head for
eyes.
TEMARI BALLS
This is an extension of the string
art manipulative which is generally two-dimensional. This three-dimensional
concept of weaving yarn and string around points on the surface of a sphere is
useful when working with spheres and concepts of non-Euclidean geometry. It is
helpful for students to have worked with a Lenart sphere previously. This
activity reinforces the concepts of lines as great circles, lines crossing at
more than one point, and triangles whose interior angle sum is greater than
180 degrees. Temari balls originated in China as small, soft deerskin balls
used by noblemen in the Imperial Court to play a kicking game. As the balls
found other uses (as juggling balls), the female servants competed with each
other in embroidering beautiful designs on the surface of the balls. In time,
the finished temari balls were popular as a girl's toy, used in mari games.
Sometimes temari were used as charms. Temari patterns were mainly geometric,
based on the curved surface of a sphere. (The Craft of Temari, Mary
Wood)
These spheres are made of soft material, enabling the student to
insert pins (representing points) into the ball and weave and sew yarn and
string around the points, creating non-Euclidean lines. By continuing to work
the yarn, the student can fill the surface of the sphere, creating
non-Euclidean geometric shapes on a curved plane. This manipulative requires
patience and experience to complete a small temari. If the ball and yarn were
increased in size, students would be able to complete a project with much less
frustration.
CONSTRUCTING AND CUTTING
GYROSCOPE ORNAMENT (CONCENTRIC
CIRCLES)
(The Ultimate Papercraft and Origami Book,
Jackson)
Particularly appropriate with Algebra I or
Geometry for reviewing point coordinates, x- and y- intercepts, quadrant
names, and use of compass.
Materials:
craft knife (extreme caution should be exercised), heavy paper or posterboard.
Begin by constructing a true perpendicular coordinate axis in the center
of posterboard. Mark each axis from 0 to 16 and -16 as appropriate. (Units of
approximately 1/2 inch are easiest to use, but smaller units may be used.)
Referring to the chart below, use a compass to construct the series of
semicircles on the coordinate axis just constructed. (Each semicircle begins
and ends on either the x-axis or the y-axis. The last construction is a
complete circle with radius of 16 units.)
When all semicircles are drawn
satisfactorily, carefully cut though posterboard with a craft knife. Cuts must
begin and end exactly on the x or y-axis. Finally, cut out the entire
structure on the 16-unit radius circle.
Unfold the rings by grasping the
opposite sides of the outer circle and folding the center portion away from
you using right angle folds. Continue folding the next ring away from you
using right angle folds until you have reached the center of the ring. The
structure should look like a gyroscope of a model of an atom with electron
orbits surrounding the nucleus.
CHART:

MORAVIAN HERRNHUT STARS
(Pennsylvania German folk
Art)
The first Christmas decoration to be hung in
Moravian communities is the large Moravian Herrnhut star beginning with the
first Sunday in Advent. The first star is credited to some boys in Neisky,
Germany about 1850 who made stars in evening handicraft sessions. In the
1880's, Pieter Verbeek made the stars for sale in the village of Herrnhut,
built on the estate of Count Zinzendorf in Saxony. The stars consist of 26
sections joined together. Originally, they were designed to fit over lighted
candles for illumination. In Germany, combinations of red and white, white and
yellow, totally red and completely yellow stars can be found. In Augsburg,
yellow stars are favored. In the United States, white stars are
preferred.
Trace 18 large cones, paying attention to the proportion of
the cones. Notice that the small cones have four sections. Two sections
overlap when gluing, so that the finished cone is triangular. The large cones
have five sections that will result, after gluing, in a square base
cone.
Cut out the cones and use a straight edge to help fold along the
fold lines accurately. Glue each individual cone's overlapping sides together.
Place seven large cones in a line and glue their overlapping tabs together.
Add tree large cones glued together on opposite sides of the center cone. This
will create a large cross. Label the tabs as shown in the diagram as #0, #1,
#2, #3. Five large square cones will be left.
Place the remaining
square cones and the eight triangular cones as shown and label them
accordingly. Start to form the sphere by gluing triangle tabs #3 to cone tabs
#3 extending from each line. Repeat procedure on remaining three sides. Then
glue rectangle tab #4 to cone tab #4, and glue cone tabs #2 together. Repeat
on three other sides. Glue triangle tab #5 to cone tab #5, and triangle tabs
#1 are glued to cone tab #1. Repeat procedure on all other sides. Last, glue
the last square cone with tab #0 if you want a complete star. If you wish to
place the star over a candle, leave the #0 tab cone out.
This creates a star with rectangular holes spaced
around the sphere. If you want a solid Herrnhut star, arrange the cones in the
same pattern as above, but do not glue overlapping tabs. Instead, as you glue,
cut off one of the overlapping tabs each time, and glue the remaining tab
inside the cone it adheres to. This is much more difficult, and you will reach
a point when you can no longer reach inside the star to glue. Then you will
have to glue the tabs on the outside. You may need to trim the tabs so they
are narrower and more triangular in shape so they will fit easily inside the
cones. For more information, contact the Moravian Book Shop listed in the
bibliography.
COMBINATION OF CONCEPTS
MEXICAN CASCARONS
(Model courtesy
of Josie Ratcliff, Jefferson City, MO.)
Cascarons are
popular holiday items. Eggs, which have been punctured at the small end with a
hole large enough to remove the contests, are filled with confetti before the
end is taped shut. The egg may have been dyed or colored previously. Or the
egg may be painted or colored after being filled with confetti.
Then
the eggshell is fitted with a cone made from a sector of a circle. Radius of
the circle must be sufficiently long so that a proportionate cone handle can
be made. Wrap and tape or glue the cone so the egg fits into the open end
securely. Glue the egg into the cone. Decorate the pointed end of the cone
with streamers. Finished cascarons are broken over the heads of celebrants
during holiday festivals.
CHINESE NEW YEAR DRAGONS
(Cricket Magazine, 1983, Barbara
Bruno)
In Chinatown, the New Year brings firecrackers
and a dragon made of paper that is long enough to cover a city block. It moves
and twists because may people are hidden underneath. The dancing dragon
symbolizes good wishes for the coming year and peace for everyone. The
following materials will construct a dragon approximately 3 feet long.
Materials needed: 5 12 x 18 sheets of
construction paper for the body, 5 1/2 by 12 inch sheets of construction paper
for the head, various scraps of construction paper, ribbon, tissue paper,
aluminum foil, glue, stapler, string, dowel sticks.
BODY: Fold and cut each of the five sheets of
construction paper into four long strips. (20 strips in all) Glue two strips
together to make a square corner. Fold by alternating strip one back and forth
from right to left as you fold strip two alternately up and down. (Fig. 1 and
2) This will produce a woven, twisted spiral body and tail. When you come to
the last two strips (or four, if you want a gradual taper), cut the strips
narrower at one end. Glue colored paper strips, tinsel, yarn, and streamers to
the end of the tail.
HEAD: Make a
pattern by folding a 5 1/2 by 6-inch paper in half, lengthwise. Copy and cut
out the shape shown (Fig. 3.) Fold a 5 1/2 by 12 piece of construction paper
in half crosswise. Unfold the pattern, trace it onto the folded construction
paper, and cut out the shape. Unfold the shape. Copy the diagram in Fig. 4.
Make a mark 1-inch from each edge on the center fold. Mark the four corners,
as shown, and use these marks and a ruler as guides to draw four straight
lines. First score the fold lines by placing the unfolded head on a stack of
newspapers. Using a ruler as a guide, draw along each line, pressing hard with
a ballpoint pen to make a groove in the paper. Carefully fold and crease along
one scored line. Unfold, then do another line until all four lines are
creased. Press the two sides in as you fold the paper in half to make the head
shape.
Unfold the head and cut slits for eyes. Also cut slits for
scales and curved nose holes. Create pointy paper teeth, spiral eyes,
eyelashes, a long curled tongue, and paper fire coming out the nose. Draw
horns as shown below, scoring along the center line to make the curved fold.
Glue the horns on behind the head.
MANE:
Use strips of curled ribbon, paper which has been fringed, curled, bent; yarn,
tinsel, confetti - whatever you can find to make a long, thick mane. Glue all
these long pieces to the back of the head. Then glue the body to the head,
covering all the messy ends. Attach a string to the head and two other places
along the body. Attach the head string to one dowel rod and the two body
strings to another dowel rod. These dowels will allow you to make the dragon
twist and dance.
SCANDINAVIAN WOODEN ORNAMENT TREE
MATERIALS
- 2 metal pins (1/4" x 3")
- 5 1/2" x 36" oak dowels
- 1 1"x36" oak dowel
- 1 2 1/4"
- solid maple apple
- 10 1 1/4" solid maple crab apples
- 3 graduated pine circles
- (4", 5", 6 1/2" x 3/4")
- wood glue, stain, tung oil, wax.
PROCEDURE
- Drill 1/4" holes in top and bottom of 1" dowel. Insert metal pins. Drill
1/4" holes in bottom of large apple and in center of 5" and 6 1/2" pine
circles.
- Drill 1/2" holes half way through sides of all 10 crab apples so they
fit on ends of 1/2" dowels.
- Drill 1" hole through center of 4" pine circle so large dowel will fit
snugly.
- Drill 1/2" holes through 1" oak dowel so that small dowels can slide
through. Space the centers of the holes as follows, measuring from the top
of the 1" dowel: 2 1/4", 7 1/4", 13 1/4", 20 1/4", 28 1/4".
- Stain as desired; finish with several coats of tung oil. Wax. Assemble,
referring to the drawing. The branches and crabapples can be glued in place
if you want a permanent tree.
BIBLIOGRAPHY
Berger, Thomas. Window
Stars. Zeist: Christofoor Publishers, 1996. ISBN:
0-6315-245-7.
Bruno, Barbara. "Chinese New Year Dragon". Cricket
Magazine, 1983.
Fuse, Tomoko. Unit Origami: Multidimensional
Transformations. Tokoyo: Japan Pub., Inc., 1990. ISBN:
0-87040-852-6.
Gerlach, Sylvia O. The Pennsylvania German Folk Art
Christmas Tree. Emmaus, Pa: Gerlachs of Lecha, 1984. (Out of
Print.)
Jackson, Paul and Angela A'Court. The Ultimate Papercraft
and Origami Book. Smithmark Pub., Inc., 1992. ISBN:
0-8317-8193-9.
Meyerbroker, Helga. Rose Windows and How to Make
Them. Stuttgart, Floris Books, 1994. ISBN: 0-86315-196-5.
The
Moravian Book Shop. 428 Main Street, Bethlehem, PA. 18018.
Rich,
Chris. The Book of Paper Cutting. NY: Sssterling Pub. Co., Inc. 1994.
ISBN: 0-8069-0286-8.
Schuman, Jo Miles, Art From Many Hands:
Multicultural Art Projects. Worcester, MA: Davis Publications, Inc., 1981.
ISBN: 0-87192-150-2.
Sharp, Gini, Wheat Weaving Creations, 1017
Apache Drive, Wichita, KS. 67207.
Waltner, Willard and Elma, "Ribbon
Weaving," Workbasket Magazine, Sept.,1978.
Wood, Mary. The Craft
of Temari. Great Britain: Search Press, 1996. ISBN:
0-85532-653-0.
Inspired by a visit to the Museum of Science and Industry display of "Christmas Trees Around the World", 1996, these ornaments are direct applications of mathematical concepts. The ornaments function as manipulative teaching devices whether the instructor displays and describes a finished ornament or the student constructs an ornament. A brief history, description, application, or function is provided for most ornaments as well as suggestions for interdisciplinary connections. In the presentation, overhead transparencies of diagrams and sketches complement these written instructions. Source materials referenced in the instructions are listed in the bibliography.
The Scandinavian Christmas Tree used to display the scaled manipulative ornaments is similar to the traditional German Feather Tree but translated into a simplified wooden tree. Spacing of branches and graduated length of branches can be altered to individual needs. (Author's scale diagram and materials used listed at end of handout.)
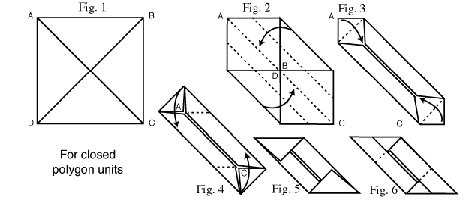
TRI-PLANE DIAMONDS
Easy introduction to simple unit paper folding. 3-D shape based on old German blown glass ornaments. Useful in demonstrating properties of 45-45-90 triangles in 3-D. Visual point-line-plane definitions. Introduces concept of interlocking units, which are stable without glue or fasteners.
Materials: six congruent squares (two each of three colors to simplify instruction).
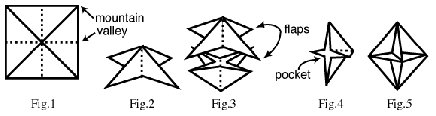
Fold each square with mountain folds along each diagonal of the square, and two valley folds that connect the midpoints of opposite sides (medians).
Lay the paper down so that the mountain folds are up and the paper forms a 3-D four-pointed star. (Fig. 1) Compress the horizontal valley folds together so that the valley folds all meet in the center to form a vertical line. You will see four right triangles sharing a common side in the center. One opposite pair of triangles forms flaps to be inserted into pockets of another square. The other opposite pair of triangles forms the pockets which will receive the flaps from another square. (Fig. 2) IMPORTANT: MARK BOTH SIDES OF EACH FLAP WITH AN "F" SO YOU KNOW WHICH POINTS ARE FLAPS. THESE MARKS WILL GET COVERED UP. Make all six folded squares exactly alike. To assemble, hold the two folded units of color one together so that the bases of {PAGE }all four right triangles on one folded unit line up exactly with the bases of the four triangles on the second folded unit. (Fig. 3) Place the pockets of one folded unit of color two across two flaps of color one. You will be covering one flap from each unit of color one. (Fig. 4) Do the same on the opposite side with the pockets of the other color two folded unit. You will be able to see one diamond-shaped plane of color one that is split down the center, and two planes of color two. One plane of color two appears solid and the other plane appears split. You need to use the two triangles of the third color to insert into the color one pockets and cover the color two flaps. Then the 3-D diamond will be complete and fairly stable. You should see three intersecting square planes, one of each color. (Fig. 5)
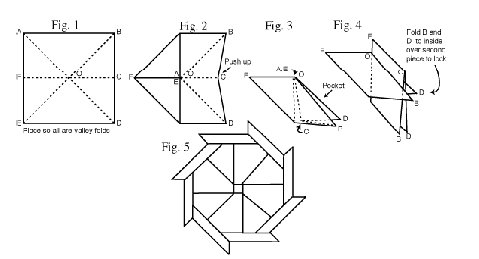
Use when discussing radial symmetry, dilation and contraction. Concept of unit origami used here to lesser degree. Materials: eight squares of paper. Make both diagonal valley folds. Make one horizontal valley fold which connects midpoints of opposite sides. (Fig. 1) Place the paper so that the horizontal fold is left to right, not up and down. Fold the upper and lower left corners in to meet the midpoint of the square. Crease sharply. Push the right half of the horizontal fold up and in so that the fold is reversed. (Fig. 2) Now fold the entire unit in half along the horizontal fold by bringing the top edge down to the bottom edge. You will have a parallelogram with two small top and bottom edges. (Fig. 3) Make all eight identical parallelograms. To assemble: the right slanted side of each unit will form a pocket into which another unit will interlock. Slide a second unit into the pocket as pictured in Fig. 4. The lower right points will be the portions that fold over another unit to lock the unit in place. (Fig. 4) When all eight units are interlocked properly, the octagon can be manipulated to dilate, leaving a center octagon, or manipulated to contract, exposing the points of an eight-pointed star. (Fig. 5)
Applies to discussions regarding radial symmetry, repetition of pattern, and approximation of circumference of circle with increasing sides of regular polygons. Europeans make these from identical folded units of translucent paper (kite paper or tissue paper), designed to hang in windows. The units are folded of square or rectangular paper, overlapped and glued, and hung in front of a light to display the shapes resulting from the overlapping of identical units. (Applications to art and color wheels, color families.) Experimentation will be successful if one rule is observed: the angle measurement of the central angle of one completed unit must be larger than 360 divided by the number of points of the star. Otherwise, there is no room for overlapping and gluing. (Window Stars, Thomas Berger)
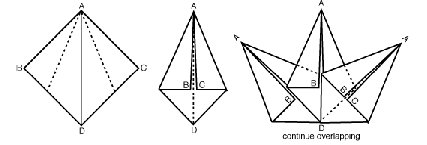
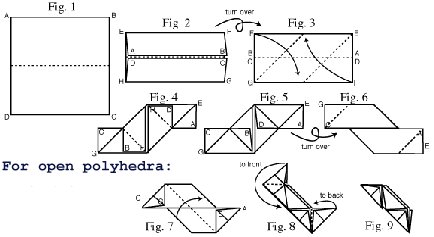
Many excellent source books are available for instruction. This activity is very simple to teach in class because students need to master only one folding sequence to make one type of unit for open polyhedra. Mastering a second type of folding sequence will enable students to make a different type of unit for solid polyhedra. (All units are folded from the same size square paper.) When students master the solid tetrahedra folded unit, teaching students to use joiner units to build sculptures is an easy step. (Unit Origami, Tomoko Fusi.) Shown below are basic folds for the open polyhedra and the closed polyhedra units. (Based on Unit Origami, pp. 62-63 and p. 134.)
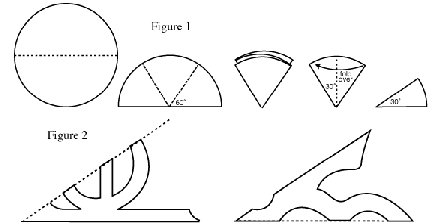
SNOWFLAKES
Useful in teaching reflection, rotational symmetry, flips and glides. Helpful in investigating properties of hexagons and investigating 30-60-90 triangles. Visual demonstration of circles, chords, rays, radii, tangents. Connect to formation and structure of ice crystals. Discuss concept of positive and negative space as design elements. See Rose Windows and Polish Wycinanka (Gwiazdy variation) for a variation of snowflakes. Only six-pointed snowflakes are considered.
Materials: Circles of thin paper, about 8 inches in diameter. (Later, students will be able to fold paper correctly without cutting circles first.)
Begin with fold across diameter of circle. Crease sharply. Mark center of diameter. Fold this semicircle into thirds. Approximate a 60-degree angle by folding one radius edge so that it lies halfway between the fold in progress and the other radius edge. This will take practice to fold accurately every time. Take care that the central angle is always extremely accurate, pointed, and sharply creased. When the semicircle has been folded into three sectors with central angles of 60 degrees, press all edges again with a pencil or edge of ruler. (Fig. 1) Last fold is to crease all triangles in half, resulting in twelve sectors with 30-degree central angles. Snowflakes can be cut into patterns similar to those found in any craft book. Try using geometry concepts such as rays, constructed arcs and semicircles, radii to the point of tangency, sine curves to create the designs. (Fig. 2) Predict the finished snowflake design by looking only at the 30-degree sector. Try printing or writing a name or message in the sector. Be careful to connect the letters to both sides of the sector.
This ornament follows directly from techniques of snowflake cutting with a few alterations. Traditionally rose windows in European cathedrals were based on a division of sixteen parts. The windows were framed with stone and iron, and colored pieces of glass were fitted into a pattern determined before construction. They were made to admit light into the dark cathedrals and to inspire worshipers with their beauty. Hung against a window, these tissue paper rose widows admit light, and the layers of color create new colors as they overlap.
One simple pattern is shown below. Experimentation will allow the student to explore many different possibilities of circle division, radial symmetry, and pattern.
Materials: Heavy cardboard rings, two of each size window you want to make. (Cut your own from poster board. The rings should be from 1/2 t 3/4 inches thick and of a neutral color.), colored tissue paper, non-drip adhesive, pencil, scissors capable of cutting fine lines and details.
First select four colors of tissue paper plus one white layer on top. Stack them up and place one of the cardboard rings on top. Trace around the inside edge of the cardboard and cut out the tissue circle, adding a margin of 1/4 inch all around as you cut. This margin will get hidden between the layers of cardboard so cutting does not have to be exact. Glue the white sheet onto the inner cardboard ring using the penciled circle as a guide to make it fit. This white sheet now serves as the foundation for the next layer. All four remaining cut-out sheets must be folded in this way: fold in half, fold in half again, fold in half once more, holding together the edges which want to spring apart. You now have eighths.
Fold in half one more time but this time fold half of the bundle upwards and flip the other half downwards to help get a precise fold. (Folds must be sharp and precise in all of these steps.) You now have one wedge. Fold all four sheets into wedges. Lay the four wedges beside each other so that they make quarter of a circle with the lightest color to the left and the darkest color to the right. (Fig. 1) Mark the seam allowance on the right wedge. Now mark the heavy curved line in Fig. 1 on the wedges, being careful not to draw over the seam allowance.
Cut along this line on each wedge. Save the four cut-off points of the wedges for later use. Unfold the lightest color wedge, smoothing out the creases as you unfold. Now lay the piece onto the base, covering the white foundation evenly. Glue it on in the same way as the white tissue paper was glued onto the cardboard ring. Unfold the second part and smooth it out.
Important: all the creases made while folding must lie exactly on top of each other. It does not matter whether the crease is facing up or down, but that the creases that are important to the pattern are exactly lined up. Continue with the third and fourth wedges. (Alignment trick: first align the vertical creases in the direction of the arrows. Then push them up or down until the remaining creases coincide.) (Fig. 2) The second cardboard ring will now cover the ugly glue area and strengthen the frame at the same time, so make sure that it is well glued. (Rose Windows, pp. 9-14.)
FALTSCHNITTEBANDER, POLISH WYCINANKA
Scherenschnitte (shear'en-schnit-tah) - "Scissors-cutting". Flat, cut-paper designs which are intricate, decorative artwork utilizing reflective symmetry. Christbaumschnitte (krist-bowm-schnit-tah) - Cut paper designs for hanging on Christmas trees. Each reflectively symmetrical design is cut twice with evenly spaced pinpricks down the center that will be used to sew the two pieces together, thus creating a 3-dimensional ornament. Faltschnittebander (fahts-schnit- ben-der) - folded paper border cuttings designed to drape on the Christmas tree like garlands. Polish wycinanka (vi-chee non-key) - cut-paper symmetrical designs with the following variations: Leluja (le-lu-ya) - Folded lengthwise and cut symmetrically, Gwiazdy (g-vee-adza) - "Star" shaped designs cut from round paper which make eight, sixteen, or thirty-two repetitions. (Art From Many Hands, Schuman.)
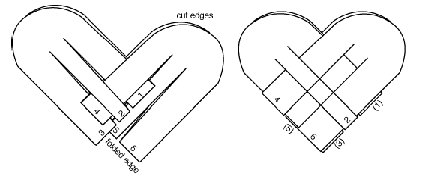
SWEDISH HEARTS
Paper: These simple hearts require two pieces of construction paper (or any paper sturdy enough to weave) and scissors. Cut two rectangles approximately 2 1/2 inches wide and 8 inches long. Fold horizontally and stack both pieces with fold down. Trim all four upper (open) edges into a curve. Cut slits 2 3/4 inches long from folded edge up toward curve. Number the sections as shown (Fig. 1) and place the two sections at right angles to each other. Weave in this order: 1 through 4, 4 through 2, 3 through 4. (4 is now completely woven. Slide it up toward curve.) Weave 5 through 1, 2 through 5, 5 through 3. (5 is now completely woven. Slide it up.) Weave 1 through 6, 6 through 2, 3 through 6. (6 is now completely woven. Adjust woven area so point of heart is neat and tight. [Fig. 2].)
Straw: Traditional materials used in Sweden to weave, tie, or braid ornaments. See example from Gini Sharp, Wheat Weaving Creations.
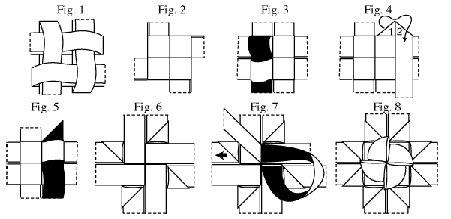
(History and directions from The Pennsylvania German Folk Art Christmas Tree.)
Paper folded stars, traditional fixtures on German Christmas trees, can be traced to the Martin Luther legend. The Star of Bethlehem symbol is of universal appeal throughout Christiandom. The origin of folded stars is ancient and is found in various forms through all cultures worldwide. German folded stars were also used outdoors to decorate evergreen and shrubbery near the house.
The weather proofing technique to keep the stars from rain or snow damage was to dip them into melted paraffin or wax. Stars are made from long strips of paper, cut evenly into one of these dimensions: 4-inch star - 4 strips of paper 1 inch wide and 30 inches long, 2 1/2 inch star - 4 strips of paper 1/2 inch wide and 18 inches long, 1 1/2 inch star - 4 strips of paper 1/8 inch wide and 13 inches long.
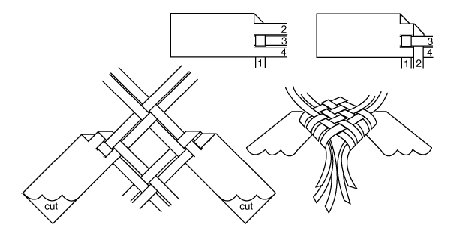
Weaving: Each star takes 4 strips of paper. Fold each strip in half and cut ends into tapered point. Place the four folded strips in interlocking position to form a basket weave. (Fig. 1.) Tighten the basket weave to interlock firmly. Turn over. Holding in left hand, turn down front strip at upper left. Crease and turn star clockwise. (Fig. 2.) Fold down 3 remaining top strips to form a second basket weave, turning clockwise. Weave the fourth strip through the first strip. (Fig 3.) Fold upper right strip away from you to make right-angle triangle #1. Fold strip toward you to form triangle #2. Fold triangle #2 over triangle #1 to form point as in Fig. 5.
Weave end down through basket weave. Turn clockwise and make points on 3 remaining upper right-hand strips. Push loose strip out of your way for last weaving. (Fig. 5.) Turn star over and repeat steps 4 and 5 until you have 8 points. The star will now have 4 strips showing back of 4 points and 4 strips covering 4 points. (Fig. 6.) To make center points, take end of lower right hand strip in right hand and with a loop motion, keeping right side up, push through upper left-hand basket weave and flat point. (Fig. 7.) Pull strip tight to form point. Turn star clockwise and continue until you have 4 points at center. Turn over and repeat on other side. (Fig. 8.) Trim ends.
(Workbasket Magazine, September, 1978)
Cut two pieces of one-inch ribbon 12 inches long. Draw a line across each strip 1 1/4 inches from each end. Mark a line at 1/4-inch intervals. Slit ribbon into four strips by pushing a pin through ribbon at one of the marks and stripping to end of ribbon. With solid portion at left, mark strips 1,2,3,4. Fold strip 1 at a right angle to itself and weave it UNDER strip 2, over strip 3, and under strip 4. (Fig. 1.) Lay second wing piece in same position with solid part at left. Fold strip 1 at a right angle and weave it OVER the 2, under the 3, and over the 4. Fold strip 2 at a right angle and weave it over 3 and under 4. (Fig. 2.)
Turn the second wing piece over, solid portion at right. Interweave strips of two wing pieces. (Fig. 3.) Push interwoven pieces together to begin forming solid woven back of bird. Place a drop of glue between each set of two ribbons at crossing to hold woven portions in position. Bring long strips up and over; continue to interweave to form hollow body of bird - four strips will be pointing in one direction, four in the other. (Fig. 4.) Draw four strips through center opening at tail end of bird, the other four strips through body opening at head end of bird. Grasp the two sets of four ribbons each, one in each hand, and pull gently until ribbons mesh and body is plump. Hold four ribbons at head end together and tie them into a knot to form head of bird. Trim extra ribbon into a point to make bird's beak. Glue tail ribbons together to hold in position where they come out of body opening; trim to desired length. Using a pin, shred ribbons to make feathers. Trim wings to shape and slit into feathers if desired. Glue black beads or sequins to the sides of the head for eyes.
This is an extension of the string art manipulative which is generally two-dimensional. This three-dimensional concept of weaving yarn and string around points on the surface of a sphere is useful when working with spheres and concepts of non-Euclidean geometry. It is helpful for students to have worked with a Lenart sphere previously. This activity reinforces the concepts of lines as great circles, lines crossing at more than one point, and triangles whose interior angle sum is greater than 180 degrees. Temari balls originated in China as small, soft deerskin balls used by noblemen in the Imperial Court to play a kicking game. As the balls found other uses (as juggling balls), the female servants competed with each other in embroidering beautiful designs on the surface of the balls. In time, the finished temari balls were popular as a girl's toy, used in mari games. Sometimes temari were used as charms. Temari patterns were mainly geometric, based on the curved surface of a sphere. (The Craft of Temari, Mary Wood)
These spheres are made of soft material, enabling the student to insert pins (representing points) into the ball and weave and sew yarn and string around the points, creating non-Euclidean lines. By continuing to work the yarn, the student can fill the surface of the sphere, creating non-Euclidean geometric shapes on a curved plane. This manipulative requires patience and experience to complete a small temari. If the ball and yarn were increased in size, students would be able to complete a project with much less frustration.
GYROSCOPE ORNAMENT (CONCENTRIC CIRCLES)
(The Ultimate Papercraft and Origami Book, Jackson)
Particularly appropriate with Algebra I or Geometry for reviewing point coordinates, x- and y- intercepts, quadrant names, and use of compass.
Materials: craft knife (extreme caution should be exercised), heavy paper or posterboard.
Begin by constructing a true perpendicular coordinate axis in the center of posterboard. Mark each axis from 0 to 16 and -16 as appropriate. (Units of approximately 1/2 inch are easiest to use, but smaller units may be used.)
Referring to the chart below, use a compass to construct the series of semicircles on the coordinate axis just constructed. (Each semicircle begins and ends on either the x-axis or the y-axis. The last construction is a complete circle with radius of 16 units.)
When all semicircles are drawn satisfactorily, carefully cut though posterboard with a craft knife. Cuts must begin and end exactly on the x or y-axis. Finally, cut out the entire structure on the 16-unit radius circle.
Unfold the rings by grasping the opposite sides of the outer circle and folding the center portion away from you using right angle folds. Continue folding the next ring away from you using right angle folds until you have reached the center of the ring. The structure should look like a gyroscope of a model of an atom with electron orbits surrounding the nucleus.
CHART:
(Pennsylvania German folk Art)
The first Christmas decoration to be hung in Moravian communities is the large Moravian Herrnhut star beginning with the first Sunday in Advent. The first star is credited to some boys in Neisky, Germany about 1850 who made stars in evening handicraft sessions. In the 1880's, Pieter Verbeek made the stars for sale in the village of Herrnhut, built on the estate of Count Zinzendorf in Saxony. The stars consist of 26 sections joined together. Originally, they were designed to fit over lighted candles for illumination. In Germany, combinations of red and white, white and yellow, totally red and completely yellow stars can be found. In Augsburg, yellow stars are favored. In the United States, white stars are preferred.
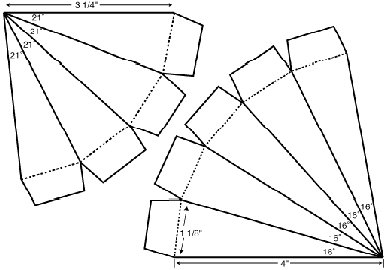
Trace 18 large cones, paying attention to the proportion of the cones. Notice that the small cones have four sections. Two sections overlap when gluing, so that the finished cone is triangular. The large cones have five sections that will result, after gluing, in a square base cone.
Cut out the cones and use a straight edge to help fold along the fold lines accurately. Glue each individual cone's overlapping sides together. Place seven large cones in a line and glue their overlapping tabs together. Add tree large cones glued together on opposite sides of the center cone. This will create a large cross. Label the tabs as shown in the diagram as #0, #1, #2, #3. Five large square cones will be left.
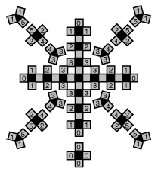
Place the remaining square cones and the eight triangular cones as shown and label them accordingly. Start to form the sphere by gluing triangle tabs #3 to cone tabs #3 extending from each line. Repeat procedure on remaining three sides. Then glue rectangle tab #4 to cone tab #4, and glue cone tabs #2 together. Repeat on three other sides. Glue triangle tab #5 to cone tab #5, and triangle tabs #1 are glued to cone tab #1. Repeat procedure on all other sides. Last, glue the last square cone with tab #0 if you want a complete star. If you wish to place the star over a candle, leave the #0 tab cone out.
This creates a star with rectangular holes spaced around the sphere. If you want a solid Herrnhut star, arrange the cones in the same pattern as above, but do not glue overlapping tabs. Instead, as you glue, cut off one of the overlapping tabs each time, and glue the remaining tab inside the cone it adheres to. This is much more difficult, and you will reach a point when you can no longer reach inside the star to glue. Then you will have to glue the tabs on the outside. You may need to trim the tabs so they are narrower and more triangular in shape so they will fit easily inside the cones. For more information, contact the Moravian Book Shop listed in the bibliography.
MEXICAN CASCARONS
(Model courtesy of Josie Ratcliff, Jefferson City, MO.)
Cascarons are popular holiday items. Eggs, which have been punctured at the small end with a hole large enough to remove the contests, are filled with confetti before the end is taped shut. The egg may have been dyed or colored previously. Or the egg may be painted or colored after being filled with confetti.
Then the eggshell is fitted with a cone made from a sector of a circle. Radius of the circle must be sufficiently long so that a proportionate cone handle can be made. Wrap and tape or glue the cone so the egg fits into the open end securely. Glue the egg into the cone. Decorate the pointed end of the cone with streamers. Finished cascarons are broken over the heads of celebrants during holiday festivals.
(Cricket Magazine, 1983, Barbara Bruno)
In Chinatown, the New Year brings firecrackers and a dragon made of paper that is long enough to cover a city block. It moves and twists because may people are hidden underneath. The dancing dragon symbolizes good wishes for the coming year and peace for everyone. The following materials will construct a dragon approximately 3 feet long.
Materials needed: 5 12 x 18 sheets of construction paper for the body, 5 1/2 by 12 inch sheets of construction paper for the head, various scraps of construction paper, ribbon, tissue paper, aluminum foil, glue, stapler, string, dowel sticks.
BODY: Fold and cut each of the five sheets of construction paper into four long strips. (20 strips in all) Glue two strips together to make a square corner. Fold by alternating strip one back and forth from right to left as you fold strip two alternately up and down. (Fig. 1 and 2) This will produce a woven, twisted spiral body and tail. When you come to the last two strips (or four, if you want a gradual taper), cut the strips narrower at one end. Glue colored paper strips, tinsel, yarn, and streamers to the end of the tail.
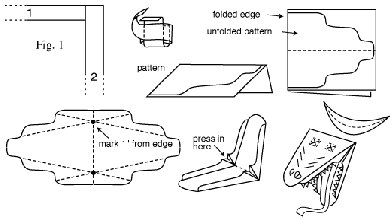
HEAD: Make a pattern by folding a 5 1/2 by 6-inch paper in half, lengthwise. Copy and cut out the shape shown (Fig. 3.) Fold a 5 1/2 by 12 piece of construction paper in half crosswise. Unfold the pattern, trace it onto the folded construction paper, and cut out the shape. Unfold the shape. Copy the diagram in Fig. 4. Make a mark 1-inch from each edge on the center fold. Mark the four corners, as shown, and use these marks and a ruler as guides to draw four straight lines. First score the fold lines by placing the unfolded head on a stack of newspapers. Using a ruler as a guide, draw along each line, pressing hard with a ballpoint pen to make a groove in the paper. Carefully fold and crease along one scored line. Unfold, then do another line until all four lines are creased. Press the two sides in as you fold the paper in half to make the head shape.
Unfold the head and cut slits for eyes. Also cut slits for scales and curved nose holes. Create pointy paper teeth, spiral eyes, eyelashes, a long curled tongue, and paper fire coming out the nose. Draw horns as shown below, scoring along the center line to make the curved fold. Glue the horns on behind the head.
MANE: Use strips of curled ribbon, paper which has been fringed, curled, bent; yarn, tinsel, confetti - whatever you can find to make a long, thick mane. Glue all these long pieces to the back of the head. Then glue the body to the head, covering all the messy ends. Attach a string to the head and two other places along the body. Attach the head string to one dowel rod and the two body strings to another dowel rod. These dowels will allow you to make the dragon twist and dance.
MATERIALS
- 2 metal pins (1/4" x 3")
- 5 1/2" x 36" oak dowels
- 1 1"x36" oak dowel
- 1 2 1/4"
- solid maple apple
- 10 1 1/4" solid maple crab apples
- 3 graduated pine circles
- (4", 5", 6 1/2" x 3/4")
- wood glue, stain, tung oil, wax.
PROCEDURE
- Drill 1/4" holes in top and bottom of 1" dowel. Insert metal pins. Drill 1/4" holes in bottom of large apple and in center of 5" and 6 1/2" pine circles.
- Drill 1/2" holes half way through sides of all 10 crab apples so they fit on ends of 1/2" dowels.
- Drill 1" hole through center of 4" pine circle so large dowel will fit snugly.
- Drill 1/2" holes through 1" oak dowel so that small dowels can slide through. Space the centers of the holes as follows, measuring from the top of the 1" dowel: 2 1/4", 7 1/4", 13 1/4", 20 1/4", 28 1/4".
- Stain as desired; finish with several coats of tung oil. Wax. Assemble, referring to the drawing. The branches and crabapples can be glued in place if you want a permanent tree.
Berger, Thomas. Window Stars. Zeist: Christofoor Publishers, 1996. ISBN: 0-6315-245-7.
Bruno, Barbara. "Chinese New Year Dragon". Cricket Magazine, 1983.
Fuse, Tomoko. Unit Origami: Multidimensional Transformations. Tokoyo: Japan Pub., Inc., 1990. ISBN: 0-87040-852-6.
Gerlach, Sylvia O. The Pennsylvania German Folk Art Christmas Tree. Emmaus, Pa: Gerlachs of Lecha, 1984. (Out of Print.)
Jackson, Paul and Angela A'Court. The Ultimate Papercraft and Origami Book. Smithmark Pub., Inc., 1992. ISBN: 0-8317-8193-9.
Meyerbroker, Helga. Rose Windows and How to Make Them. Stuttgart, Floris Books, 1994. ISBN: 0-86315-196-5.
The Moravian Book Shop. 428 Main Street, Bethlehem, PA. 18018.
Rich, Chris. The Book of Paper Cutting. NY: Sssterling Pub. Co., Inc. 1994. ISBN: 0-8069-0286-8.
Schuman, Jo Miles, Art From Many Hands: Multicultural Art Projects. Worcester, MA: Davis Publications, Inc., 1981. ISBN: 0-87192-150-2.
Sharp, Gini, Wheat Weaving Creations, 1017 Apache Drive, Wichita, KS. 67207.
Waltner, Willard and Elma, "Ribbon Weaving," Workbasket Magazine, Sept.,1978.
Wood, Mary. The Craft of Temari. Great Britain: Search Press, 1996. ISBN: 0-85532-653-0.